I wrote a small python script that extracts the content from Alcatel .tim firmware files. It took some time staring at hex values, as well as a fair amount of guess work to figure out the file format. Continue reading “An unpacker for Alcatel TiMOS images”
There has been, again, some development within the loki domain. Today I’m going to write about the latest module added to the suite, a module for decoding and cracking Cisco’s TACACS+.
On March 16th, 2015, at the Troopers IPv6 Security Summit, we finally released the SI6 Networks’ IPv6 Toolkit v2.0 (Guille). The aforementioned release is now available at the SI6 IPv6 Toolkit homepage. It is the result of over a year of work, and includes improvements in the following areas:
Lately we had to analyze QR-Codes in a pentest. Those held some random data which was used as a token for login and we wanted to know if that data was really random.
Last week I had the pleasure to give you my impressions regarding my experience about hacking for b33r at Ghent, that is, my participation at BruCON 2014 hacking conference. As I said among else, the reason that I was there was to present Chiron, my IPv6 penetration testing/security assessment framework, which was supported by the Brucon 5×5 program. The first version of Chiron had been presented at Troopers 14, during theIPv6 Security Summit.
As we continue our research in the 3GPP protocol world, there is a new tool for you to play with. It is called s1ap_enum and thats also what it does 😉
The tool itself is written in erlang, as i found no other free ASN.1 parser that is able to parse those fancy 3GPP protocol specs. It connects to an MME on sctp/36412 and tries to initiate a S1AP session by sending an S1SetupRequest PDU. To establish a S1AP session with an MME the right MCC and MNC are needed in the PLMNIdentity. The tool tries to guess the right MCC/MNC combinations. It comes with a preset of known MCC/MNC pairs from mcc-mnc.com, but can try all other combinations as well.
As we historically have a strong connection to network technologies (not surprising, given the “NW” in “ERNW” stands for “Networks”), I developed a small script to create RFC-style ASCII representations of protocol schemes. The following listing shows an example created for a fictitious protocol:
Having just finished the second “Advanced Attack Techniques against IPv6 Networks” workshop (some of the course material can be found here), organised and hosted by ERNW and their partner HM Training Solutions, I would like to take this opportunity to release publicly one of my scripting tools, an IPv6 scanner. This tool is based on Scapy (so you have to install Scapy and its prerequisites before using it). It should not be considered as a replacement or a competitor of nmap against IPv6 or of the scanners incorporated into the great IPv6 toolkits already released by Marc Heuse and Fernando Gont, but, instead, as a tool released mainly for educational purposes. Specifically, this scanner, apart from supporting some of the most well known port scanning techniques, from ping scanning to SYN, RESET, ACK, XMAS, etc., etc., TCP or UDP scanning, it also combines, by using the suitable switches, some IDS/IPS evasion techniques. As I have found out up to now, at least two of them, if used “properly”, can be effective against a very popular IDS/IPS software used by many “Fortune 100” companies out there. This means that you can launch actually any type of the supported network-scanning techniques while flying under the radar of this specific IDS software (and perhaps some other too, who knows…). But first of all, as always please check the corresponding README file.
Its been a long time, since i released the last version of pytacle, but now the time has come. Here is alpha2 with some new features:
– Support of RTLSDR sticks
– Possibility to scan for cells around you
– Changed the code to generate real KCs (but as nobody noticed the wrong KCs i guess you were good with the others 😉
Im also planning to address hopping channels in the future, but ive not made it far enough in my DSP lecture, yet 😉
Find the new version here.
Also see this post for requirements.
With HTML 5 the current web development moves from server side generated content and layout to client side generated. Most of the so called HTML5 powered websites use JavaScript and CSS for generating beautiful looking and responsive user experiences. This ultimately leads to the point were developers want to include or request third-party resources. Unfortunately all current browsers prevent scripts to request external resources through a security feature called the Same-Origin-Policy. This policy specifies that client side code could only request resources from the domain being executed from. This means that a script from example.com can not load a resource from google.com via AJAX(XHR/XmlHttpRequest).
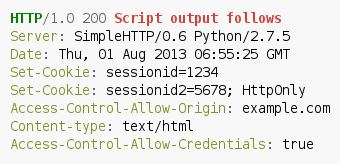
As a consequence, the W3 consortium extended the specification that a set of special headers allows access from a cross domain via AJAX, the so called Cross-Origin Resource Sharing (CORS). These headers belong to the Access-Control-Allow-* header group. A simple example of a server response allowing to access the resource data.xml from the example.com domain is shown below:
The most important header for CORS is the Access-Control-Allow-Origin header. It specifies from which domains access to the requested resource is allowed (in the previous example only scripts from the example.com domain could access the resource). If the script was executed from another domain, the browser raises a security exception and drops the response from the server; otherwise JavaScript routines could read the response body as usual. In both cases the request was sent and reached the server. Consequently, server side actions are taking place in both situations.
To prevent this behavior, the specification includes an additional step. Before sending the actual request, a browser has to send an OPTIONS request to the resource (so called preflight request). If the browser detects (from the response of the preflight) that the actual request would conflict with the policy, the security exception is raised immediately and the original request never gets transmitted.
Additionally the OPTIONS response could include a second important header for CORS: Access-Control-Allow-Credentials.
This header allows the browser to sent authentication/identification data with the desired request (HTTP-Authentication or cookies). And the best: this works also with HTTP-Only flags :).
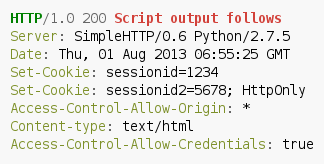
As you may notice, the whole security is located in the Access-Control-Allow-Origin header, which specifies from which domains client side code is allowed to access the resource’s content. The whole problem arises when developers either due to laziness or simply due to unawareness) set a wildcard value:
This value allows all client side scripts to get the content of the resource (in combination with Access-Control-Allow-Credentials also to restricted resources).
That’s where I decided to create a simple proof of concept tool that turns the victim browser into a proxy for CORS enabled sites. The tool uses two parts. First, the server.py which is used as an administrative console for the attacker to his victims. Second, the jstunnel.js which contains the client side code for connecting to the attacker’s server and for turning the browser into a proxy.
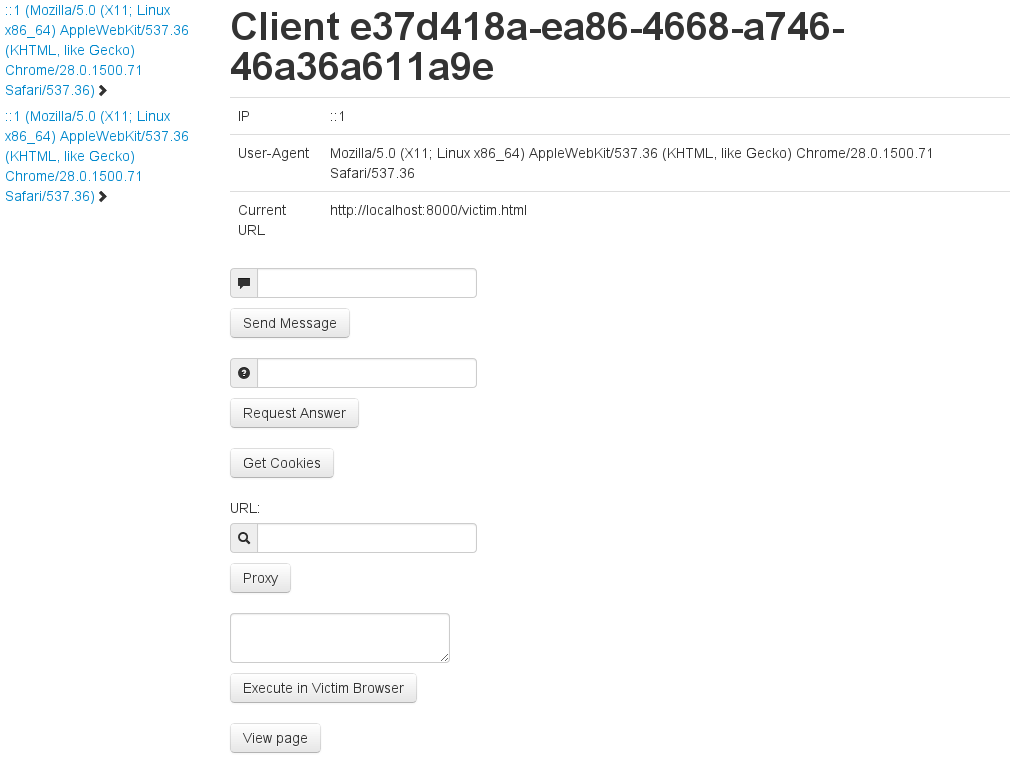
After starting the server.py you could access the administrative console via http://localhost:8888. If no victims are connected you will see an almost empty page. Immediately after a victim executes the jstunnel.js file (maybe through a existing XSS vulnerability or because he is visiting a website controlled by you…) he will be displayed in a list on the left side. If you select a connected victim in the list, several options become available in the middle of the page:
Some information about the victim
Create an alert popup
Create a prompt
Try to get the cookies of the client from the site where the jstunnel.js gets executed
Use the victim as a proxy
Execute JS in the victims browser
View the current visible page (like screenshot, but it is rendered in your browser)
If you select the proxy option and specify a URL to proxy to, an additional port on the control server will be opened. From now on, all requests which you send to this port will be transferred to the victim and rerequested from his browser. The content of the response will be transferred back to the control server and displayed in your browser.
As an additional feature, all images being accessible by JavaScript, will be encoded in base64 and also transferred.
You will find a vulnerable server in the test directory
This kind of functionality is also implemented in the Browser Exploitation Framework (BeEF), but I liked to have some lightweight and simple proof of concept to demonstrate the issue.