This is a 3-part series which introduces and analyzes Cisco’s implementation for Autonomic Network. In the 1st part, the technology is introduced and we have an overview about communication flow. In the 2nd part, Cisco’s proprietary protocol is reverse engineered ? then finally in the 3rd part, multiple vulnerabilities will be disclosed for the first time. If you’re aware of the technology, you can skip directly to part 2 where the action begins!
Autonomic Network is Cisco’s vision for the future of smart networks. Autonomic systems have the ability to self-manage themselves. In other words, autonomic systems are smart enough to configure and secure themselves, optimize the running processes and re-run the failed processes. Cisco engineers in collaboration with IETF defined the Autonomic Networks main components and features through multiple RFCs found in the ANIMA workgroup. Cisco has deployed the Autonomic Network capabilities on their systems since 2014 and multiple big companies started to integrate and make use of Autonomic Network features within their systems.
All what you need is a single device which supports autonomic features to have an up and running network. You can check whether your image supports autonomic features or not by writing the command “autonomic” in the global configuration mode. This command allows your device to send and listen to layer 2 probes sent out by the autonomic devices.
The main building block of the autonomic networks is one device called the registrar, it is the controlling point of the network, it has a list of the allowed devices which are allowed to join the domain. The registrar can act as a certificate authority (CA) which issues certificate for the nodes within the domain or it can refer to an external certificate authority to carry out such a task. The communication flow is like the following:
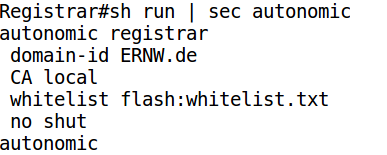
- The registrar is configured with the domain name, the whitelist (optional) and whether it will act as the certificate authority or it will refer to an external one.
- The registrar will create a 3072-bit RSA and will request a domain certificate from the CA.
- As soon as the registrar receives the certificate, it starts sending out layer 2 probes to discover any autonomic capable devices.
- When a new devices (enrollee) receives the registrar probes, it responds back asking to join the domain.
- The registrar checks its whitelist and responds back with either acceptance or rejection.
- Once the enrollee device is granted permission to join the network, it generates a 3072-bit key and passes it back to the registrar.
- The registrar forwards the key to the CA and ask it to issue a certificate which acts later as a proof that the enrollee is part of the domain.
- After the enrollee receives the certificate from the registrar, they agree on a security mechanism to protect further communication. This is done through either DIKE or IPSec.
Configuring the whitelist is optional, if it is not configured then the registrar will accept all received requests. The whitelist contains the UDIs (Unique Device Identifier) of the allowed devices. A UDI is a combination of both the device model and the serial number.
If the enrollee is a greenfield device (i.e.: doesn’t have any configuration), there is no need even to configure on it anything, the greenfield devices listen by default to the autonomic layer 2 probes while you need to configure the brownfield devices with the “autonomic” in the global configuration mode. A sample of how the whitelist and registrar configuration looks like is presented in the next figures.

This concludes the (short) first part of the blog post series. We will dive deeper into how these devices interact in the second part of the series which will be released shortly.
I hope to see you all this week in Heidelberg! Have a great week everybody!
Cheers,
Omar