Recently I’ve started some research on MikroTik’s RouterOS, the operating system that ships with RouterBOARD devices. As I’m running such a device myself, one day I got curious about security vulnerabilities that have been reported on the operating system and the running services as it comes with tons of features. Searching for known vulnerabilities in RouterOS on Google doesn’t really yield a lot of recent security related stuff. So I thought, there is either a lack of (public) research or maybe it is super secure… 🙂
Not really satisfied with the outcome of my research about previous research one day I thought I give it a shot and just take a quick look at the management interfaces, mainly the web interface. As it turns out, there could be a third explanation for the lack of security related search results on Google: obfuscation. The communication of the web interface is obfuscated, most likely encrypted, which may discourages researchers that just came around to search for low hanging fruits.
RouterOS WebFig
RouterOS is a proprietary operating system for routers, based on Linux. It is available for various architectures, including x86. It can be downloaded directly from the vendor’s page and is usable for a couple of days without buying a license, which makes it really nice for researching. RouterOS provides different interfaces for device management:
- Winbox is a native application for Windows
- WebFig is a web interface
- Access to a Cisco-like shell via SSH/Telnet
- An API that is not enabled by default
This blog post will cover the WebFig interface running on TCP port 80. By default there is no HTTPS interface available (which would lead to using untrusted certificates anyway). However, the release notes of RouterOS 5.5 state: “webfig – encrypt whole session even in non https mode;”. Here it becomes quite interesting. The question is: how are they actually encrypting HTTP traffic without using SSL/TLS? I’ve fired up Burp and started to inspect the HTTP request of WebFig.
The first couple of requests look like ordinary HTTP requests fetching several files, all in clear. But at some point the browser will send AJAX requests to /jsproxy that look something like this:
POST /jsproxy HTTP/1.1
Host: 192.168.0.1
Content-Length: 72
Content-Type: text/plain;charset=UTF-8
Referer: http://192.168.0.1/webfig/
Accept-Encoding: gzip, deflate
Cookie: username=admin
Connection: close
ÄÄÄÄÄrL¼:8ÃãÂOdä0dNämSIÃ.û=¯'ÃÃkU+¾Â¾æw]
This doesn’t look really helpful, just some binary gibberish. But as the browser sends this request, it is triggered via JavaScript that has previously been loaded by the browser. The interesting code is located in a file at /webfig/engine-0d3b305455ef.js (from now one, this file will be called engine.js). It includes many code referring to cryptographic functions, including implementations for algorithms like SHA1, MD4, RC4 and DES, so the HTTP POST body is most likely encrypted. So whenever encryption is happening, there needs to be some kind of key agreement between the browser and the server. How does WebFig solve this part?
The most interesting part is implemented in the function Session.prototype.makeResponse(). After feeding the engine.js file to a JavaScript beautifier the code will look like this:
Session.prototype.makeResponse = function(user, pwd, r) {
    var magic = "This is the MPPE Master Key";
    var magic1 = "Magic server to client signing constant";
    var magic2 = "Pad to make it do more than one iteration";
    this.txseq = 1;
    this.rxseq = 1;
    var rchallenge = str2a(r.substr(8));
    var lchallenge = [0x21, 0x40, 0x23, 0x24, 0x25, 0x5E, 0x26, 0x2A, 0x28, 0x29, 0x5F, 0x2B, 0x3A, 0x33, 0x7C, 0x7E];
    var chlgHash = sha1(lchallenge.concat(rchallenge).concat(str2a(user))).slice(0, 8);
    var pwdHash = md4(ustr2a(pwd.substr(0, 256)));
    var pwdHashHash = md4(pwdHash);
    var response = [];
    for (var j = 0; j < 3 * 56; j += 56) {
        var key = [];
        for (var i = j; i < j + 56; i += 7) { var w = (pwdHash[i >> 3] << 8) | (pwdHash[(i >> 3) + 1] << 0); key.push((w >> (8 - (i & 7))) & 0xfe);
        }
        response = response.concat(des(chlgHash, key));
    }
    var masterKey = sha1(pwdHashHash.concat(response).concat(str2a(magic))).slice(0, 16);
    this.rxEnc.setKey(this.makeKey(masterKey, false, false));
    this.txEnc.setKey(this.makeKey(masterKey, true, false));
    var reserved = [0, 0, 0, 0, 0, 0, 0, 0];
    var msg = ([0, 0]).concat(lchallenge).concat(reserved).concat(response);
    return word2str(this.id) + word2str(0) +
        a2str(rchallenge) + a2str(msg) + user;
};
The first three lines already looked quite familiar to me. The strings in magic1 and magic2 are constants used in MS-CHAP-V2, a challenge-response authentication protocol developed by Microsoft. It is used e.g. in the PPTP VPN protocol or in WPA2 enterprise. Most of the function is actually a JavaScript implementation of MS-CHAP-V2, something I haven’t seen anywhere else. Compared to traditional HTTP authentication methods like HTTP Basic Authentication the password will not be sent in clear. The following picture illustrates the MS-CHAP-V2 protocol flow:
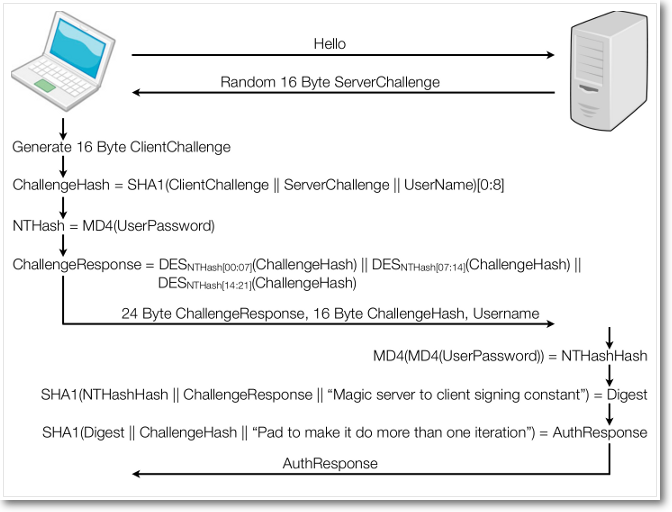
It’s quite complex although it’s just a challenge-response authentication protocol. However, the security of the protocol can be reduced to just a single DES encryption, which makes it feasible to bruteforce. For further information about the security of MS-CHAP-V2, watch the excellent talk Defeating PPTP VPNs and WPA2 Enterprise with MS-CHAPv2. As the focus of this blog post is not the security of the authentication, we will continue with the actual encryption. Just keep in mind that the WebFig authentication shares the same (in)security properties like PPTP and WPA2 enterprise.
Back to the makeResponse() code. The string in magic belongs to the standardized key derivation for MPPE, another protocol developed by Microsoft that defines a way to encrypt PPP frames with RC4. Additionally there is another interesting function which is called by makeResponse(): Session.prototype.makeKey():
Session.prototype.makeKey = function(masterKey, isSend, isServer) {
    var magic2 = "On the client side, this is the send key; on the server side, it is the receive key.";
    var magic3 = "On the client side, this is the receive key; on the server side, it is the send key.";
    var v = masterKey.concat([]);
    for (var i = 0; i < 40; ++i) v.push(0);
    if (isSend == isServer) {
        v = v.concat(str2a(magic3));
    } else {
        v = v.concat(str2a(magic2));
    }
    for (var i = 0; i < 40; ++i) v.push(0xf2);
    return sha1(v).slice(0, 16);
}
There are yet another two constants that belong to the key derivation for MPPE. So WebFig authenticates users with MS-CHAP-V2, which generates a “response” that is used to derive encryption keys according to RFC 3079. Then it encrypts HTTP POST bodies with RC4. Both directions, from the browser to server and from the server back to the client, use separate keys. In order to decrypt payloads one could just use a JavaScript debugger in e.g. Chrome or Firefox to observe the plain texts before/after encryption/decryption. After spending some time in the Chrome debugger, I thought it might be useful to have something that decrypts payloads as they leave the browser or even tamper with payloads and automatically encrypt them again.
WebFixy: A WebFig Decryption Proxy
I’ve started to implement a web proxy – WebFixy – That decrypts WebFig traffic on-the-fly in order to observe what the browser sends to WebFig and what WebFig sends back to the browser. Implementing the proxy functionality was quite simple. Porting the crypto functions was not so straight forward. Here I just want to point out some useful information about the implementation.
UTF(8) or GTFO
As JavaScript always operates with UTF8 strings, that’s one thing to keep in mind when it comes to crypto stuff like hashing or encryption. As encrypting arbitrary strings without proper en/decoding will obviously lead to different ciphertexts, implementing the WebFig crypto in Python requires some attention. WebFixy is implemented with Python 3, which in my opinion makes stuff like that a lot easier to deal with as in Python 2.
During the process of implementing WebFixy I’ve read a lot about unicode and UTF encodings, especially in the context of JavaScript. I found that the blog post JavaScript has a Unicode problem and the talk Hacking with Unicode in 2016, both by Mathias Bynens, are very good resource about this topic.
The Not-So-NULL NULL Byte
The WebFig ciphertexts will most likely start with something like:
ÄÄÄÄÄEach of these characters is sent as two bytes: \xc4\x80. At first, I wondered why WebFig should add such strange characters, turns out these are not any characters: they are NULL bytes. The reason is the word2str() function:
function byte2str(b) {
    b &= 0xff;
    return String.fromCharCode(b ? b : 256);
}
function word2str(w) {
    return byte2str(w >> 24) + byte2str(w >> 16) +
        byte2str(w >> 8) + byte2str(w);
}
The word2str() function will turn four byte integers to strings by calling the byte2str() function on each byte. This function first masks each byte with 0xff and then checks if it’s zero. Then it returns the actual character that corresponds with the given integer or 256 if the given integer is zero. So e.g. trying to convert a NULL byte with this function will lead to 0 & 0xff, which is 0, so the character code for 256 will be returned. Encoding this character will actually yield the bytes ‘\xc4\x80’. In Python, this could look like this:
>>> input = 0
>>> input = input & 0xff if input & 0xff else 256
>>> input
256
>>> chr(input)
'Ā'
>>> bytes(chr(input), 'utf8')
b'\xc4\x80'
I’m not really sure why the code is doing this.
RC4 Key Scheduling: Foreplay is Important!
The RC4 implementation is actually a “RC4-drop(768)” meaning it drops the first 768 bytes of the the key stream in order to be more resistant against related-key and other key scheduling attacks. Check out this for further information. This is quite important because a WebFig session will use the same sending/receiving keys throughout the complete session. As requests/responses are encrypted/decrypted the key stream changes from byte to byte, it is crucial to keep track which bytes have to be encrypted/decrypted with what portion of the key stream. This is especially important when messages arrive out of order.
Obfuscate-then-Encrypt
Decrypting the WebFig traffic is just the first step to uncover the inner workings of WebFig. Here is an example of a decrypted message sent back from WebFig to the browser after successful authentication:
{Uff0001:[87],uff000b:131070,s17:'x86',s15:'x86',s12:'',s11:'i386',sfe0009:'default',sff000a:'admin'}Most of the communication between the browser and WebFig will actually look like this, just JSON objects including obfuscated object keys. A lot of these obfuscated keys can be extracted by reading the JavaScript code, so e.g. s11 is the architecture, s15 the boardname and sfe0009 the skin. I’ve started to extract some of these values so that WebFixy will map them when printing messages. However, these are not complete yet.
Future Work?
I hope to spend some more time on this topic and on RouterOS in general. There are many topics that could be quite interesting:
- Obfuscation/Encryption in the Winbox protocol
- API implementation
- What about the captive portal functionality?
Unfortunately, I haven’t found any research on any of these topic so there could be a lot more to explore 🙂
Conclusions
Implementing the WebFig crypto was quite interesting and entertaining. I’m not sure exactly why the developers took such a hard path, but I think it was worth it. It’s not a perfectly secure protocol because at the end of the day it’s based on something that is broken anyway. But compared to plain HTTP communication where sensitive data like login credentials would be sent in clear, or active attackers could tamper with HTTP traffic by e.g. injecting malicious JavaScript code, it’s not so bad. Sure, compared to a proper TLS session it’s nuts, but the device would most likely ship with an untrusted certificate so that’s not really an option.
I hope this helps anyone who wants to dig deeper into WebFig or RouterOS in general. Feedback and pull requests for WebFixy are always welcome! 🙂
Was just looking at the webfig comms and getting curious enough to look under the hood – this excellent article has saved me quite a few hours.. cheers!
Hello. do you think this can be implemented in browser-side javascript anyhow?
Sure, it would be rather easy to implement it. As the whole logic is already running in the browser to handle the traffic encryption, you could just reuse most of the code (especially everything that is required for the crypto part). You could e.g. implement it as a browser extension that allows you to intercept the requests and handles encryption/decryption. However, the tricky part is handling the state of the session so that you will have the proper key for each message that has to be encrypted.
Thanks Niklaus. I’ve never done smth like this before. Maybe you can recommend me any tools how i can reverse-engineer what is happening in the browser so that i can repeat that?
Kind of Chrome developer tools on steroids?)
Reverse-engineering it is quite simple: you can just use the developer tools in your browser. In Chrome e.g. you can press F12, go to “Sources” and there you should see the JS files that are executed. There you can use breakpoints on potentially interesting functions to see all the variable values. From those JS files (mainly the engine-*.js file) you can just copy-paste the functions you need to any other JS script.
The interception/rewriting could be implemented similiar to plugins like Tamper Data (https://addons.mozilla.org/de/firefox/addon/tamper-data/). Checking our the code (http://tamperdata.mozdev.org/source.html) might be a good start to learn how to implement such functionality in a browser plugin.
btw, here is a changelog from the v6.43 (RC currently)
!) webfig – improved authentication process;
so, i think they will at least throw away MD4+RC4 stuff.
Also, they make some strange change for the API auth:
https://wiki.mikrotik.com/wiki/Manual:API#Initial_login
[skipped]
Password is sent in plain text.
[end]
One can, of course, use SSL for API. It becomes mandatory now in fact:)
Thanks for the hint, that’s actually quite interesting that they are changing the authentication process. However, I think this is only related to the API, which is not the same as WebFig. Do you know if they also changed anything on the WebFig authentication?