A while back Stefan and I held a little crash course/orientation run on hardware hacking at a German Fachhochschule. Planning to use something “real” we went for a simple electronic safe with a bunch of different vulnerabilities. I guess most security guys who spend a fair amount of time in hotels will understand this choice. As we needed something we could rely on would break, we stripped the device and swapped the original electronics for our own. The result was the “Damn Vulnerable Safe”.
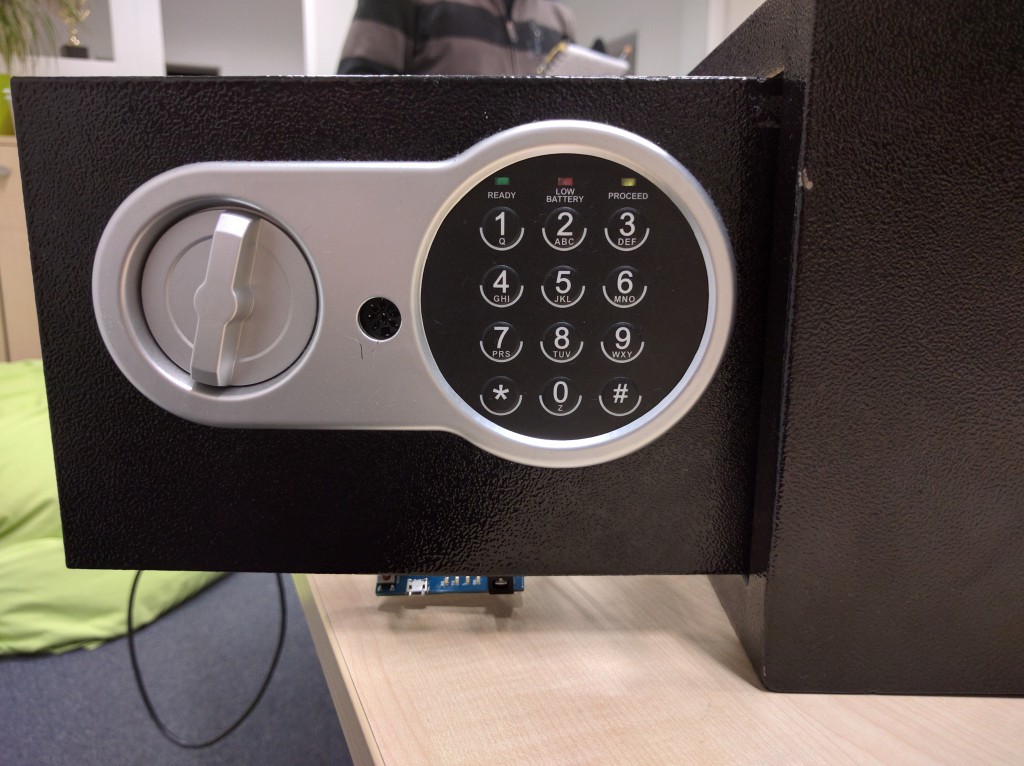
The Damn Vulnerable Safe (DVS) is based on a little black safe we bought on the Internet. It has a 12 button pad (0-9, #, *), three hardwired LEDs, a knob for opening the safe and (it had) a physical lock for back up access. Due to it’s color it was the perfect black box. But it sadly was not a reasonable safe. Although this is not a product review, a little hint on the side: If you ever buy a cheap (~50€) safe expect security on the level of a children’s toy.
For the course we needed a simple device which could be broken by beginners while covering vulnerabilities existing in real life. It had to be reliable in such a way that nobody would set it in an “unknown state”, in order to reduce trouble shooting and ensure proper hacking. Also we needed something with a safe “infrastructure”, meaning the device itself should work and be resettable.
From the beginning on we decided to stick to something Arduino based, as these are well known, documented and simple but at the same time flexible and cheap. Also they offered enough IO pins and different interfaces, which would be attackable. Above that we had some and could reuse them!
Vulnerabilites
- Recovery Interface (“Ooops, I forgot my PIN”)
Knowing (having worked out) how a few safes which are often used in hotels work, the first vulnerability we selected was a simple recovery interface. On real safes these often appear as a DIN- or USB-socket or sometimes even as something like a PC card interface (the blank contacts on the side of a PCIe card etc.). These interfaces are used, when a hotel guest forgets his PIN. Usually somebody will come up to the room, connect a magic hand held to the safe and open it. Following this example we decided to go for the DIN-socket, as it would fit into the hole which had had the physical lock in it. As we could not decide which protocol to expose, we decided to implement three different ones:- Serial – A classical serial/UART interface, which can be identified using various tools and offering a plain serial console which will open the safe and allow the attacker to change the PIN.
- Programming/internal memory interface: We made the actual pins used for flashing the controller accessible via the socket. This way an attacker can extract the firmware or insert his own.
- External memory interface: By exposing I²C we are able to expose an emulated flash memory chip. Here an attacker is able to extract the stored PIN and master PIN.
- Information leak in PIN validation algorithm
The algorithm for validating the typed PIN was programmed with a little but effective fault: It exits after the first incorrect digit.
As such if going for the the PIN 9999:
-When the user enters 9990, the loop verifying the entries will exit after checking the fourth digit
-When the user enters 9000, the loop will exit after the first digit
Although on real devices the time differences would be very very small (just a few cycles), we implemented the vulnerability in such a way, that the attacker is actually able to hear the time difference between entering the last digit and the beep stating the wrong entry. This vulnerability reduces the maximal necessary amount of tries for bruteforcing the PIN from 10*10*10*10 = 10.000 to 10 + 10 + 10 + 10 = 40. - Vulnerable counter for incorrect entries
As with most PIN based approaches, the safe locks input after three incorrect tries for a few seconds – a cool down time. This way bruteforcing is made unfeasible. For the DVS the algorithm will then check the PIN, give an output (beep for a second) and then increase the counter by one. Now, once somebody cuts power to the safe by shorting two pins on the recovery interface, the counter can not be increased. As the counter is not increased the safe never locks out input and the bruteforce attack can be performed without any delay. Above the duration constraint, this vulnerability also mitigates a device lock down which can only be removed by a master PIN. - “Open” Pin
The worst vulnerability is a magic pin on the recovery interface, which would open the safe, when connected to ground. This vulnerability is actually only intended as initial candy 🙂
Damn Vulnerable Safe
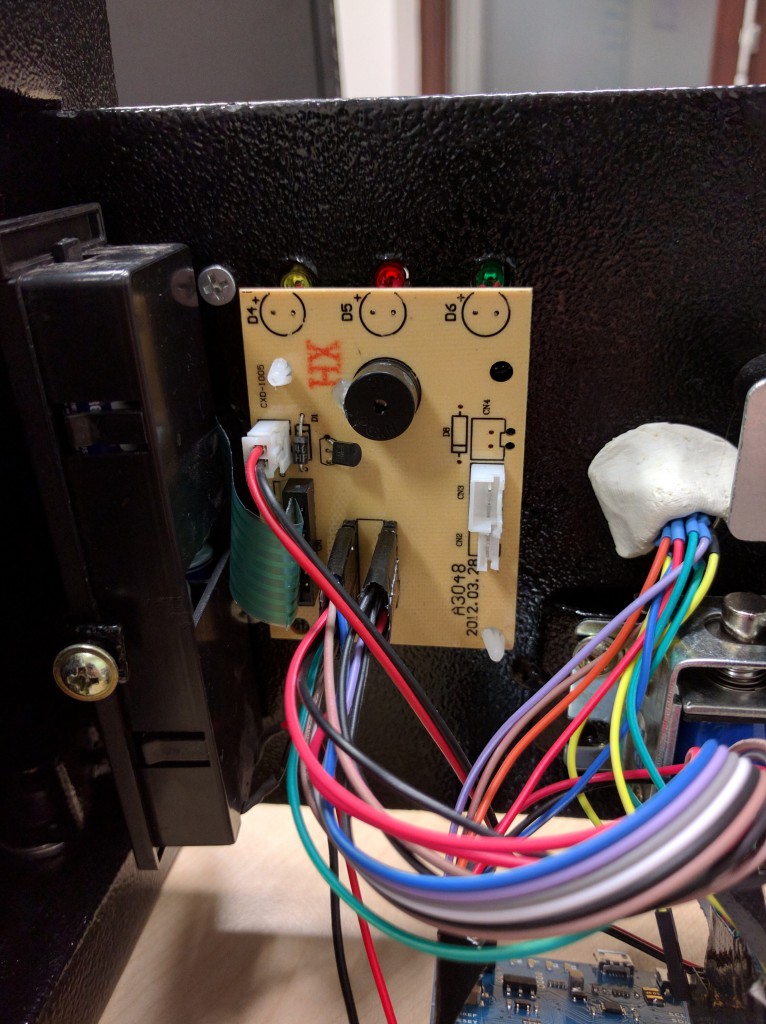
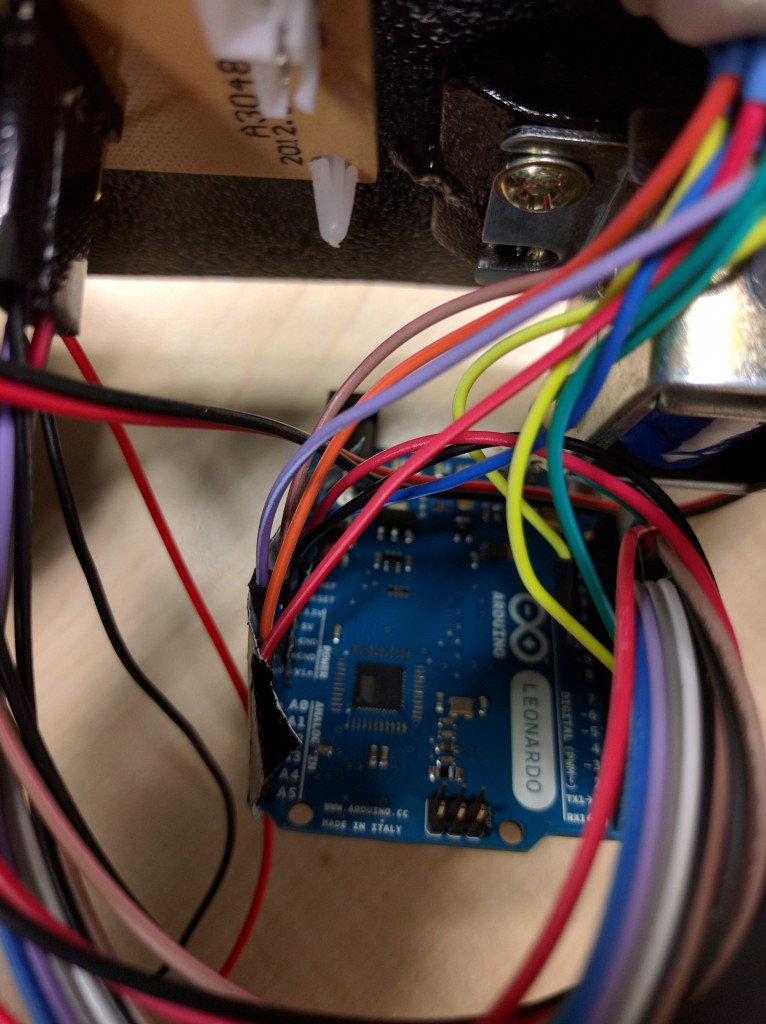
Our implementation of the DVS was rigged together by using an Arduino Leonardo, the original PCB which was in the safe and a few jumper wires. Although it might not look professional it’s a great feeling to crack open a black box and get access to some loose wires!
We stuck to the original PCB as it already contained a header for the PIN pad’s cable and driver circuit for the locking mechanism. All we did was remove the original controller, trace the PCB and work out what which pin actually did.

We then connected all lines to the Arduino and wrote basic driver functions for all sensors and actors in the safe. For powering, we were able to use the battery compartment in the safe, so no cables were necessary. Adding a little bit of black nasty made sure that no wires would go loose.
Tools
Of course one needs a certain set of tools to attack a device like the DVS. As we did not want to >need< a large toolkit during the course, all exercises are optimized in such a way that a multimeter, an Arduino (for automation and for reading data from BUSes) and a few jumper wires are sufficient.
Although a JTAGulator can be very helpful for identifying UART and also a Logic Analyzer would be a great for finding other interfaces, we stuck to the “grey box” approach. If you have opened it for the first time, you have a look inside and start tracing wires! Even though a locked safe is a completely black box, you can expect an attacker to have done his homework. Speaking safes, this means an attacker will most surely have bought his own, opened it and done some reversing. This way it is easy to identify pins and their use. It’s actually also a good way of teaching how to find and read datasheets. Just as with all other attacks and penetration tests, recon is key to an efficient approach.
Attacks & Tasks
Although we did the same course four times on a single day, we decided against making a set of slides. The aim was to make the students work on the box and not read slides. Above that we knew we had far more tasks than time.
Eventually we used a text file and only gave a very rough description of tasks and asked a few questions which made all attendees stay on track:
- What interfaces does the safe have?
- How does it react to entries?
- What do the pins on the recovery interface do?
Using the multimeter, their ears and eyes all attendees managed to quickly open the safe and identify multiple vulnerabilities.
For the last tasked all started some automation code on the Arduino. With the right set of code it can even be used as a very simple logic analyzer.
Taking it to the Next Level
Everything that we ourselves have learned while preparing and giving the course is currently flowing into our Troopers’16 Hardware Hacking training. While the DVS course was aimed at giving a dirty 90 minutes of fun, hacking and breaking stuff, the Troopers training is actually aimed at teaching the attendees everything they need to know for their own first steps with a black box.
We will cover:
- First contact – Iteration of external interfaces
- Reversing & Documentation – Iteration of all parts and their interconnections
- Home Work – Finding, reading and understanding datasheets
- BUSes – Understanding all communication within the device
- Attacks & Exploitation – Using all available interfaces
- Firmware – Extraction and understanding
- Tools – Software and magic adapters and how to make you own
Right now we’re in the middle of finishing a custom victim to be broken, owned and reversed in March. We are creating both hardware and software with stacks of vulnerabilities and functions which are broken by principle.
If you’d like to check out the result, Stefan and I would both be very happy to welcome you at our training during Troopers!
Brian