During one of our pentests in some corporate environment we were to analyze an application-server called Liferay. Liferay comes with a lot of functionalities, runs on top of Apache Tomcat and includes a nice API that makes it very easy to add components or further functionality that are not part of the core. These (potentially selfmade) “addons” are called “portlets” and they can be inserted in any place in the frontend.
We quickly found an active default-account (test@liferay.com : test) which immediately led to the question: how to get access on the system-layer through the account on the application. Because we were not aware of any portlet which provided the desired functionality, we decided to write it on our own and created a straight-forward portlet for system level command execution.
As mentioned above, Liferay offers an API for adding portlets to the core. This can be done by creating a standard war-file which contains java-classes, including the desired functionality and some – in this case – Liferay-specific xml-based configuration files. War files are often used to expand the functionality of java-servers (e.g. Tomcat can also be extended via war-files) – it just needs to contain the application-specific xml-files.
Our java-class includes a html-form consisting of an input-field and a button, which sends commands (via GET) to the server. On the server the input gets executed in a shell – a new java HTTP-Shell is born. After some adjustments regarding to the operating system and the java compiler (1) we had a GET-Parameter-based HTTP-Shell.
The following steps are necessary to deploy the shell portlet:
How to create the war-file?
2.) Unzip
3.) Execute create.bat / create.sh [Note: javac and jar must be installed in the PATH.]
4.) Have fun with the ShellPortlet.war
How to deploy the war-file?
1.) Login to your Liferay-System with a privileged user-account and open http://yourdomain.com/group/control_panel/manage
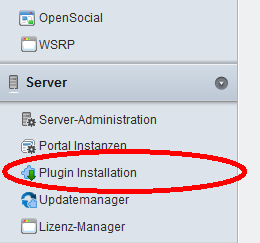
2.) You should find a category called “Server” on the left side in the navigation. Click “Install Plugin” and on the next site click “Install more plugins” followed by “Fileupload”
3.) Upload the war-file and use “tail -f $CATALINA_HOME/logs/catalina.out” or (on Windows) the Tomcat-console to observe the logs for any error/exception. When everything worked you’ll find an entry like “1 Portlet for ShellPortlet is available for use”
4.) Now go back to your mainpage via the link in the upper area “Back to Liferay”. Then click “Add” -> “More” and you will see all categories in which the portlets are sorted.
5.) If everything went right you will find a category named “Ownage” in this list. Click on it and drag&drop the shellportlet anywhere on your website.
6.) Have fun playing! 🙂
This shows – once again – that it’s not that hard to gain system-access over a (web-) application. Everyone who uses web-applications should secure the higher-privileged accounts by strong passwords or better deactivate them in case they are not needed. It also shows that – once again – comprehensive and reasonable hardening would have prevented the compromise of yet another system.
(1): The java-class must be compiled by the same compiler-version which the tomcat-server is using. (E.g.: If the tomcat uses jre1.6, the java-class in the war-file must be compiled by a javac which is out of the jdk1.6)
SHA1-Hash: f6a7764f098ecc516479dbf6da2ff0017414de00


I’ll demo my own Liferay Java Shell next week at BerlinSides. It doesn’t need an additional portlet, “XSLT Content” is enough …