Embedded devices often serve as an entry point for an attack on a private or corporate network. The infamous attack on HackingTeam, for example, followed exactly this path as was revealed here. Although the attack may have been for the greater good (refer also to this great keynote), such incidents demonstrate that it is important to properly secure your embedded devices. In a recent blog post, Niklaus presented how he analyzed the security posture of a MAX! Cube LAN Gateway. Moreover, Brian reported a few weeks ago on the security posture of IoT devices (and in particular on one of his cameras). With this post I would like to share my experiences with analyzing another embedded device: the IC-3116W IP camera by Edimax.
This post will focus mainly on how to get started with analyzing this particular device, but the presented techniques and tools can be used for other devices as well. In particular, I will present a step-by-step introduction that includes 1.) how to obtain the firmware and use it to gather information, 2.) how to gain system access, and 3.) how to install gdbserver on the device. Moreover, I will not disclose any ‘sophisticated’ vulnerabilities in this post and only focus on those vulnerabilities that help in analyzing the device. In particular, this will include a remote code execution vulnerability in the administration interface (which has been reported to the vendor; see disclosure timeline at the end of the post).
Analyzing the device – A multi-step approach
In the following, I will present the different steps that I have taken to build a proper testing environment for the camera. In my case the initial steps did not really differ from a usual web application penetration test. That is, there was an initial phase where information about the cam has been gathered either from external sources (website of vendor, google, …) or by scanning the exposed services of the cam (in particular the administrative interface) with suitable tools (Burp Suite, nmap, …). Then there was the exploitation phase, where persistent access to the camera has been gained. And finally there was the post exploitation phase, where proper debugging/analyzing tools have been built and deployed on the cam.
Step 1: Gathering Information
A crucial step in the analysis of the device is to gather as much information as possible. Fortunately, Edimax provides a lot of information such as data sheets, manuals, firmware and a toolchain (+ files to build the image) for the camera on its website (however, the source code for some interesting binaries on the cam was missing).
The firmware provided some first great insights into the internals of the cam. By using binwalk on the firmware, it was possible to extract the file system of the camera.
$ binwalk -e IC3116W_v2.10.bin

DECIMAL         HEX             DESCRIPTION
-------------------------------------------------------------------------------------------------------
605             0x25D           LZMA compressed data, properties: 0x88, dictionary size: 1048576 bytes, uncompressed size: 65535 bytes
10392           0x2898          LZMA compressed data, properties: 0x5D, dictionary size: 8388608 bytes, uncompressed size: 3735204 bytes
1245312         0x130080        Squashfs filesystem, little endian, version 4.0, compression: lzma, size: 4072088 bytes,  907 inodes, blocksize: 131072 bytes, created: Mon Feb 22 11:50:40 2038
As can be seen, the developers used a SquashFS filesystem. To explore the filesystem, I used unsquashfs (with LZMA support):
$ unsquashfs -d filesystem 130080.squashf
This gives us the uncompressed filesystem (saved in the folder filesystem).
$ ls -a filesystem

.  ..  bin  dev  etc  home  init  lib  mnt  proc  sys  test  tmp  usr  var  web  www
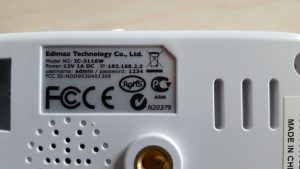
Having extracted the filesystem, the files on the camera can be explored. The filesystem contains some interesting binaries such as telnetd, wget, ftp, and many more. A nmap scan (default IP address is printed on the back of the device) reveals, however, that the telnet daemon is not running by default (but, nevertheless, we should keep this in mind for later).
$ nmap -sS -p0- --reason -v -T3 -Pn 192.168.2.3

[...]
Nmap scan report for 192.168.2.3
Host is up, received arp-response (0.00065s latency).
Not shown: 65534 closed ports
Reason: 65534 resets
PORT     STATE     SERVICE     REASON
80/tcp   open      http        syn-ack
554/tcp  open      rtsp        syn-ack
MAC Address: 74:DA:38:34:AA:75 (Unknown)
[...]
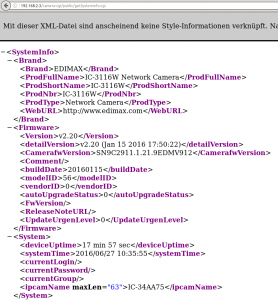
The root directory of the web server is under www. A look into this folder revealed some interesting cgi files that are accessible without authentication, namely
- /www/camera-cgi/public/anonymous.cgi
- /www/camera-cgi/public/getSysteminfo.cgi
- /www/camera-cgi/public/supportiPhoneAppVersion.cgi
In particular, the anonymous.cgi and getSysteminfo.cgi reveal a lot of information on the setup of the IP camera (such as internal IP addresses, firmware version, etc.).
Access to the filesystem is great to see what files are present on the cam and to gather information based on these files. As a next step, automatic scanning and manual testing of the running services is used to reveal how the cam works internally. Hence, it is time to play with the applications that are running on the cam. As shown above by the output of the nmap scan, there is a web server running at port 80 (for the administrative web interface). The default credentials are admin with password 1234, conveniently printed on the back of the camera.
And with this we come to the part where we gain system access.
Step 2: Gaining System Access
By automatic scanning and manual testing of the web interface it has been found that System Log allows for remote code execution. By using the path for telnetd, the telnet service can be started in the following way:
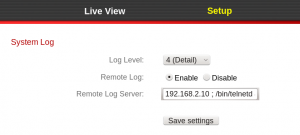
Now it is possible to connect via telnet to the camera:
$ telnet 192.168.2.3
Trying 192.168.2.3...
Connected to 192.168.2.3.
Escape character is '^]'.

IC-34AA75 login: admin
Password:
RLX Linux version 2.0
         _           _  _
        | |         | ||_|
   _  _ | | _  _    | | _ ____  _   _  _  _
  | |/ || |\ \/ /   | || |  _ \| | | |\ \/ /
  | |_/ | |/    \   | || | | | | |_| |/    \
  |_|   |_|\_/\_/   |_||_|_| |_|\____|\_/\_/

For further information check:
http://processor.realtek.com/


BusyBox v1.13.4 (2015-02-25 18:14:22 CST) built-in shell (ash)
Enter 'help' for a list of built-in commands.

# cat /etc/passwd
admin:$1$yAn92Ld/$u5nHFH9nLds0naDaLuK1d/:0:0:System Administrator,,,:/:/bin/sh
The credentials for the telnet login are the same as for the web interface (user: admin, pass: 1234). From /etc/passwd it can be seen that only the user admin (with uid 0 and gid 0) is present on the system. Therefore, we directly have root access to the system.
It should be noted that one can also gain a shell on the system via the UART port. The port can be seen in the following image (the pins were initially removed and have been soldered onto the board).
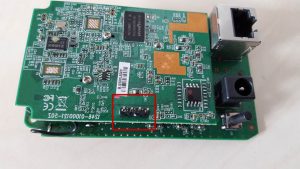
To communicate with the UART port, separate devices such as JTAGulator can be used. The system access can now be used to deploy the necessary tools in order to analyze the camera.
Step 3: Setting up a Research Environment
There are a number of tools on the camera that help us to analyze the running processes. Unfortunately, however, there is no debugger or compiler on the cam. Our aim (at least for this blog post) is to have a running debugger on the cam. More specifically, I would like to run gdbserver on the cam and gdb locally on a x86 machine.
Running gdbserver on the cam (instead of gdb itself) has a few advantages. First of all, the file size of the gdbserver binary is much smaller than the full gdb binary. Since disk space can be a rare resource on embedded devices, gdbserver is often the only option. Second of all, gdbserver has fewer dependencies than gdb itself and is therefore easier to cross-compile. Of course, there are also disadvantages in using this setup. For example, complications may arise if the register sizes of the host system (i.e. the system running plain gdb) and the target system (i.e. the system running gdbserver) differ. That is also the reason why I let gdb run on a x86 machine.
To install binaries onto the cam it is desirable to get files to and off the cam easily. In order to get files to the cam, we can use wget (the squashfs filesystem is read-only, however, a flash memory has been mounted to /var, where we can therefore write to). To transfer files from the cam, lighttpd (the camera’s web server), can be used. By starting another instance of this server with the root directory set to “/” one can download all of the files from the camera.
Having established a way to transfer files between the cam and my host system, it is time to start cross-compiling gdbserver. To do so, we first need to know which processor is used by the cam.
# cat /proc/cpuinfo
system type             : RTL819xD
processor               : 0
cpu model               : 56322
BogoMIPS                : 658.63
tlb_entries             : 32
mips16 implemented      : yes
As can be seen from the output above, a RTL819xD has been used, which is a MIPS-based processor. Therefore, I first tried to use a standard MIPS cross-compiler. A great source for cross-compilers is the Aboriginal Linux web site. They do not only provide a number of cross-compilers there, but have also shell scripts that set up a complete built environment for a certain architecture (based on qemu).
The underlying Realtek CPU, however, uses a modified instruction set such that plain MIPS binaries will usually not run on the camera (only very simple binaries may run). But as I mentioned earlier, Edimax also provides a toolchain for its camera. Using a CentOS 7.3 and the supplied toolchain, I set up a build environment for the camera. Instructions for setting up the build environment where given within a pdf that has been provided with the toolchain. As written within the document, it basically boils down to
- step 1: cd TARGET_DIR
- step 2: bzip2 -cd rsdk-{VERSION}-{LIBRARY}-{PLATFORM}.tar.bz2 | tar xvf –
- step 3: ln -s rsdk-{VERSION}/{PLATFORM}/{LIBRARY} rsdk
- step 4: export PATH=TARGET_DIR/rsdk/bin:$PATH
Using the CentOS system I can now cross-compile binaries for the camera. To cross-compile gdbserver, for example, the following commands can be used:
$ cd gdbserver_src
$ ./configure  --host=mips-linux CC=rsdk-linux-gcc
$ ./make CC=rsdk-linux-gcc AS=rsdk-linux-as LD=rsdk-linux-ld
By using the environment variables CC, AS, and LD, the compiler, assembler, and loader can be set for the compiling and loading process. Finally, we obtain a gdbserver binary that can be run on the camera.
The corresponding gdb binary can be obtained in a similar way. Fortunately, however, a pre-compiled binary for x86 systems (that interact with a gdbserver on a MIPS system) has already been provided within the build chain. If one would like to obtain this binary from scratch, however, one would have to use different parameters for the compiling process
$ cd gdb_src
$ ./configure  --target=mips-linux
$ ./make
In this build process we have to specify the target system (i.e. the system that gdbserver will run on). Moreover, I had to test different gdb/gdbserver versions and finally found gdb-6.8 working for me with the cam.
Finally, I would like to show how the gdb/gdbserver setup can now be used to analyze running binaries on the cam. So first of all we copy the gdbserver binary to the /var directory of the cam and make it executable via chmod. To attach now to a process with gdbserver the following command has to be executed:
# /var/gdbserver ip:port --attach pid
Here the IP is the address of the host system that runs gdb. The port given in the command will be opened on the target system. Moreover, the pid is the process id for the process that we would like to connect to. Of course, we can also start a new process on the cam (without attaching to an existing one) by providing a path to an executable instead of the –attach argument.
As an example we attach to the /bin/ipcam binary running on the cam:
# /var/gdbserver 192.168.2.10:1234 --attach 9266
Attached; pid = 9266
Listening on port 1234
After executing the command, gdbserver is waiting for incoming connections on the specified port 1234. On the x86 host we start the corresponding gdb executable and connect to the target system in the following way:
$ rsdk-mips-gdb -q
(gdb) target remote 192.168.2.3:1234

Remote debugging using 192.168.2.3:1234
[New Thread 9266]
0x2ab6b89c in ?? ()

(gdb)
However, as we can see gdb has no function context, i.e. it does not know where it currently is. This is because gdb has to load the symbols table for the binary that will be debugged on the target server. Therefore, one has to use the file command (in gdb) on the binary once locally to load the symbols table. Moreover, to debug library calls a local copy of the camera’s file system should be kept and gdb should be run from within the root directory (this ensures that the libraries can be found on the host x86 system).
$ cd cam_root_dir
$ rsdk-mips-gdb -q
(gdb) file cam_root_dir/bin/ipcam
Reading symbols from cam_root_dir/bin/ipcam...(no debugging symbols found)...done.
(gdb) target remote 192.168.2.3:1234
Remote debugging using 192.168.2.3:1234
[New Thread 9266]
0x2aaa8a40 in _start() from cam_root_dir/lib/ld-uClibc.so.0
(gdb)
Now you can use gdb as though it were running natively on the cam (i.e. set break points, analyze registers, etc.). Therefore, we now have a versatile environment for analyzing the services that are running on the cam.
As I mentioned at the beginning of the post, the identified vulnerabilities have been reported to the vendor. The disclosure timeline is as follows:
- 2016-05-03 Email to support@edimax-de.eu to establish contact
- 2016-05-04 Response by Edimax; PoC for vulnerabilities was forwarded to appropriate contact person
- 2016-06-13 Email to contact person to get a status update
- 2016-06-14 Response by Edimax with status update
- 2016-07-21 Email to contact person to get a status update
- 2016-07-22 Response by Edimax with statement that a new firmware will be released within one week
- 2016-08-01 Email to contact person to get a status update
- 2016-08-01 Response by Edimax with statement that the release date of the new firmware has been delayed (no new release date has been given)
- 2016-08-29 Email to contact person to get a status update
- 2016-08-29 & 2016-08-30 Response by Edimax with statement that new firmware will be released on 2016-09-14
- 2016-09-15 Email to contact person to get a status update
- 2016-09-20 Response by Edimax with statement that the release of the new firmware has been delayed (reasons have been disclosed within the mail)
- 2016-09-26 Email to contact person with the release date for this blog post
- 2016-09-26 Response by Edimax with statement that a status update on the release date of the new firmware will be given when it is known
Therefore, as of today there is no firmware update for the camera that fixes the identified vulnerabilities. Hence, in the meantime other measures have to be applied to prevent a potential exploitation. To prevent the information leak via the anonymous.cgi, getSysteminfo.cgi, and supportiPhoneAppVersion.cgi, for example, access to these sites should be restricted by other means, e.g. via a separate firewall. Of course, one can also just get system access as described above and re-configure the cam as necessary.
For the remote code execution of the authenticated area of the web interface it has to be ensured that access to this area is restricted. First of all, the default credentials of the cam should be changed (but this should be done anyway). Moreover, depending on the use case of the camera, access to the web interface via the Internet may not be necessary and can be blocked in such a case.
Cheers
Oliver
Hi does the remote code execution vulnerability has a registered CVE id?
Hi, I have reported the vulnerability to the vendor, but a CVE id was not assigned.