We’re using our smart phones every day to manage contacts, calendar entries, e-mail, and social communication (please note that we at ERNW still have a strict “no company data on smartphones/tablets” – which includes email). Everything is easy to use and automated syncing provides access to our data from anywhere. Data is stored in most cases on premises of a cloud service provided by the OS vendor of your smart phone – mostly Google, Apple or Microsoft. You don’t need to pay for this service – and the cloud provider could use your data for personalization and service improvements.
But from a security point of view (or just because you don’t want to share your personal information with the cloud provider) one probably wants to use all those features with a service on your own infrastructure.
This blog post describes the synchronization of Android smart phones to own hosted groupware suite for calendar, contacts and e-mail as a first step. How to “free” your Android smart phone is not focus of this post: The FSFE (Free Software Foundation Europe) provides the project “Free Your Android”. I’ll discuss some points of getting “freeing” Android phones in another blog post following in a few weeks.
What you’ll need is just the following:
- An Android smart phone (it’s not necessary to root it).
- A server running your private groupware suite for CalDAV/CardDAV connection.
- Access to your contacts and calendar data on the cloud service with export functionality.
I’ll use SOGo as groupware suite on a vserver running Debian. You could easy integrate an already installed IMAP server etc. as e-mail backend. For session handling and storage SOGo uses a SQL database. The web GUI of SOGo provides a clear interface for accessing e.g. e-mails, address book and calendar.
Step 1: Google Data Export
The first step of getting Google-Free we need to export the contacts and calendar entries and remove them. First log into your Google Account and start Gmail.
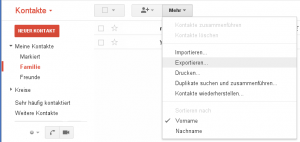
Access your contacts and go to “more” and select “Export”. On the “Export Contacts” pop up select “All contacts” and choose “vCard format”. Then click “Export”. Store the contacts.vcf on your local machine for later import into your groupware suit. After successful export you may want to delete all your contacts from your Google Account.
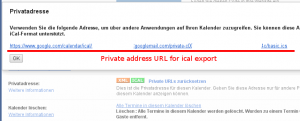
In a second step, start the Google Calendar and select the calendar you want to export. Click on the arrow and select “calendar settings”. Go to the “private address”, click on “ICAL” and download the ical file for later groupware import. After successful export you may want to delete the calendar or all contents on the same page.
Step 2: Groupware Import
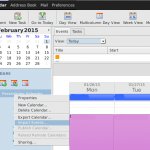
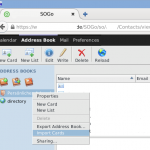
Now it’s time to import your data into your private owned system. SOGo supports importing via the web GUI: Log into your SOGo Account and just import the contacts and calendar events into you existing personal address book and calendar. Right click on the calendar or address book and choose “Import Cards” / “Import Events”. After successful import you could access the data inside SOGo.
Step 3: Disable Google Sync
This step is only necessary, if you use Google to sync your calendar and contacts to prevent unwanted sync of your private data. Go to Settings and Accounts and remove the Google account or switch off at least the synchronization of Contacts and Calendar.
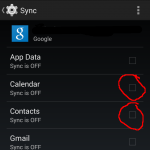
Step 4: Setup your Android smart phone
Unfortunately Android doesn’t support DavCAL out of the box. You first need to install a CalDAV/CardDAV App which supports syncing of contacts and calendar events. I use DavDroid. It’s open source and available over the F-Droid (for free) or Google Play (costs about EUR 2,99).
For any app, you will need the URLs provided by your groupware. SOGo provides an URL for access CalDAV/CardDAV like https://myhost.tld/SOGo/dav/<user>/Calendar/personal/ and https://myhost.tld/SOGo/dav/<user>/Contacts/personal/
With DavDroid you could sync your personal address book and all calendars you setup inside your SOGo account. You just need the base URL https://myhost.tld/SOGo/dav/<user> and your username and password to setup a DavDroid account. Go to settings and add a new account using DavDroid:
- Check register with “URL and username”
- Add the base URL myhost.tld/SOGo/dav/<user> and your user credentials (https is default and shouldn’t be changed)
- Setup an unique name for the new CalDAV/CardDAV account
- Save the settings
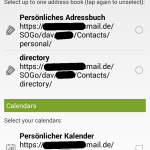
That’s all. DavDroid starts to sync the data and you could use them as usually inside your favorite calendar and contacts app. And there is no disadvantage using your own system for synchronizing the data instead of Google.
Enjoy your first step to become a bit more Google-free and restore the control over own data 🙂
Pro & Con
Pro:
- You’ll get back the ownership and control of your data.
- CalDAV/CardDAV is a (mostly) standardized protocol.
- Adding synchronization is easy to set up and integrate into Android.
- You don’t need to root your Android – it works with the stock ROM.
- Customized ROMs like CyanogenMod, Replicant or OmniROM use the same setup.
- You could also use CalDAV/CardDAV synchronization on your pc desktop applications.
Con:
- You need a third party software for CalDAV/CardDAV synchronization on Android.
- The deployment of your own groupware needs expert knowledge (perhaps you have a friend to help ;-))
- The security of the server is your own responsibility. Alternately you could use a different CalDAV/CardDAV service.
- Backup of the data is now your job 🙂
Enjoy,
Chris